
CARTE PCI FIREWIRE/USB 2.0 À HAUT DÉBIT #F5U508VEA1 - PCI expansion card BELKIN - Free user manual and instructions
Find the device manual for free CARTE PCI FIREWIRE/USB 2.0 À HAUT DÉBIT #F5U508VEA1 BELKIN in PDF.

User questions about CARTE PCI FIREWIRE/USB 2.0 À HAUT DÉBIT #F5U508VEA1 BELKIN
0 question about this device. Answer the ones you know or ask your own.
Ask a new question about this device
Download the instructions for your PCI expansion card in PDF format for free! Find your manual CARTE PCI FIREWIRE/USB 2.0 À HAUT DÉBIT #F5U508VEA1 - BELKIN and take your electronic device back in hand. On this page are published all the documents necessary for the use of your device. CARTE PCI FIREWIRE/USB 2.0 À HAUT DÉBIT #F5U508VEA1 by BELKIN.
USER MANUAL CARTE PCI FIREWIRE/USB 2.0 À HAUT DÉBIT #F5U508VEA1 BELKIN
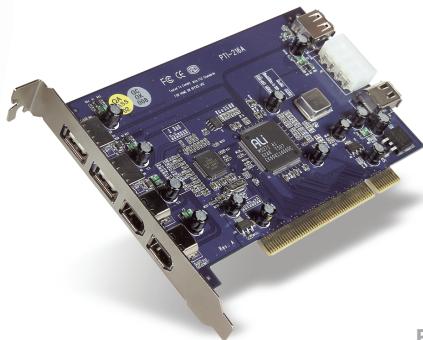
USB 2.0 and Firewire 6-Port PCI Card

natural_image
Two people smiling while looking at a laptop keyboard (no visible text or symbols)User Manual
Upgrade your notebook for ultrafast performance

natural_image
Close-up of a blue PCI-32 microcontroller with visible circuitry and ports (no text or symbols)F5U508

BELKIN®
USB 2.0 and Firewire 6-Port PCI Card

natural_image
Two people smiling while looking at a laptop displaying a grid of icons (no visible text or symbols on the device)User Manual
Upgrade your notebook for ultrafast performance
natural_image
Close-up of a blue PCI-based electronic circuit board (no visible text or symbols)EN
F5U508
Table of Contents
Introduction ....1
Overview....2
Features....2
Specifications 2
Package Contents....3
System Requirements....3
Operating System Compatibility ....4
Installation 5
Installation Procedure for Windows 98 SE ....5
Verifying Proper Installation (Windows 98 SE)....7
Installation Procedure for Windows Me 8
Verifying Proper Installation (Windows Me) 9
Installation Procedure for Windows 2000....11
Verifying Proper Installation for Windows 2000 with Service Pack 4 ... 12
Verifying Proper Installation (Windows 2000)....14
Installation Procedure for Windows XP 17
Verifying Proper Installation for Windows XP with Service Pack 1 ..... 18
Verifying Proper Installation (Windows XP)....21
Installing a hi-speed usb 2.0 hub....22
Value-Added Software 23
Information....25

Welcome to Belkin Hi-Speed Connectivity!
Thank you for purchasing the Belkin Hi-Speed USB 2.0 and FireWire PCI Card (the PCI Card).
Now you can upgrade your computer to the latest USB and FireWire® technology. You will be able to take advantage of a host of new Hi-Speed USB 2.0 and FireWire products!
Your USB 2.0 and FireWire products—including hard drives, scanners, printers, video cameras, and more—will all work much faster than ever before. Your current USB devices will continue to work as they always have and, in some cases, even better with this PCI Card. Follow the simple installation instructions in this manual to get your PCI Card up and working—then enjoy the speed and convenience of Belkin!
Overview
Features
• 3 Hi-Speed USB 2.0 ports (2 external, 1 internal)
- 3 400Mbps FireWire ports (2 external, 1 internal)
- Simultaneous connection capability for low-, full-, and high-speed devices
- Auto-detection of new devices as they are connected, along with the speed of each device
- Backward-compatibility with USB 1.1 devices
• Full compliance with USB specifications
• Full compatibility with OHCI-compliant FireWire peripherals
- Plug-and-Play technology
- Internal auxiliary DC power connector
Specifications
PCI Interface
- Compliant with PCI specification 2.2 (Also backward-compatible with 2.1)
• Supports PCI power management specification 1.1
USB Interface
• USB revision 2.0-compliant
- Open Host Controller Interface- (OHCI-) compliant (USB 1.1 Host Controller)
• EHCI-compliant (USB 2.0 Host Controller)
- Current: 500mA per port
• Supports up to 127 devices
• Supports system sleep modes S1–S4
FireWire Interface
• 2 external 400Mbps IEEE 1394 ports
- OHCI 1.0-compliant
- IEEE 1394a rev. 5-compliant
- Internal auxiliary power connector
• Supports 8 isochronous transmit DMAs
• Supports 4 isochronous receive DMAs
- Power output: 15 watts (12V @ 1.25A) per port with auxiliary power from computer power supply
- 5 watts (12V @ .05A) without auxiliary power from computer power supply
Package Contents
- Belkin Hi-Speed USB 2.0 and FireWire PCI Card
- User Manual
- Installation CD
System Requirements
• 266MHz Pentium® II processor
- 32MB RAM
- One available PCI 2.1- or 2.2-compliant PCI slot
- Windows® 98 SE, 2000, Me, or XP
Operating System Compatibility
| Operating System | USB 1.x Support | USB 2.0 Support | Firewire Support |
| Windows 98 SE | Yes | Yes | Yes |
| Windows 2000 | Yes | Yes | Yes |
| Windows Me | Yes | Yes | Yes |
| Windows XP | Yes | Yes | Yes |
Please refer to the section that corresponds to your version of the Windows operating system.
Installation Procedure for Windows 98 SE
This installation procedure will successfully install two USB 1.1 OHCI controllers, one USB 2.0 EHCI host controller, and one IEEE 1394 host controller.
- Insert the F5U508 installation CD into your CD-ROM drive. After a few moments the main menu will automatically start and display each of the available installation options.
- Select "Install USB 2.0 Driver". After clicking "Next" on the InstallShield Wizard, select "No, I will restart my computer later". Then click "Finish". Then click "Exit" on the F5U508 screen.
- Open the Start menu in the lower, left-hand corner of your Windows display. Select "Shut Down" and click "OK".
- Once the computer has completely shut down, remove the computer's cover and locate an empty PCI slot.
- Remove the port cover that corresponds with the PCI slot you wish to use. (The cover is usually held in place with a single screw).
- Insert the PCI Card into the slot. Apply pressure as needed until the Card is fully seated. Secure the PCI Card with the screw removed in step #5, above.
- After installing the PCI Card, replace the outer cover and turn on the computer.
- When Windows restarts, the PCI Card will be detected and installation of the required drivers will begin.
Installation
Note: Depending on the speed of your computer, it may take up to 30 seconds for the PCI Card to be detected.
- Windows will detect the "PCI Universal Serial Bus" and the "Add New Hardware Wizard" dialog box will open. Click "Next".
- Select "Search for the best driver for your device" and click "Next".
- Uncheck all the boxes and click "Next".
- Windows will locate the drivers for "ALi USB to Open Host Controller". Select "The updated driver (Recommended)". Click "Next".
- Windows will find the driver for "ALi PCI to USB Open Host Controller." Click "Next".
- You will now be prompted to insert the Windows 98 SE installation CD into your CD-ROM drive. Insert the CD, then click "Finish".
Note: The directory being displayed on the screen requesting your Windows 98 SE installation CD may not be correct. Typically, the drivers are located in a folder labeled "Win98" on your Windows 98 SE CD.
- Windows will detect the "PCI Universal Serial Bus" and the "Add New Hardware Wizard" dialog box will open. Click "Next". Repeat steps 9 through 13 then click "Finish".
- Windows will now find and install the driver for "ALi USB to Enhanced Host Controller", then detect "PCI OHCI Compliant IEEE Host Controller". Click "Next".
- Select "Search for the best driver for your device" and click "Next".
- Uncheck all the boxes and click "Next".
- Windows will locate the drivers for "PCI OHCI Compliant IEEE 1394 Host Controller". Click "Next".
-
Click "Finish" to complete installation of the IEEE 1394 host controller.
-
Windows may prompt you to restart your computer. Click "Yes" to restart.
Installation of the PCI Card is now complete.
Verifying Proper Installation (Windows 98 SE)
Check the “Windows Device Manager” to confirm that your PCI Card has been properly installed.
- Right-click on "My Computer" and select "Properties".
- Select the "Device Manager" tab.
- Click on the plus sign (+) next to "Universal Serial Bus Controllers".
The “Universal Serial Bus Controllers” list will now include two “ALi to USB Open Host Controller” entries, one “ALi to USB Enhanced Host Controller” entry, one “USB 2.0 Root Hub” entry, and two “USB Root Hub” entries.
Note: If your computer features built-in USB ports, or if you have other USB PCI controller cards installed, you will see additional USB controller and root hub entries.
- Click the plus sign (+) next to "IEEE 1394 Bus Controller".
The “IEEE 1394 Bus Controller” list will now include one “PCI OHCI Compliant IEEE 1394 Host Controller” entry.
Note: If your computer features built-in IEEE 1394 ports, or if you have other IEEE 1394 PCI host controller cards installed, you will see additional “IEEE 1394 Host Controller” entries.
Installation
Installation Procedure for Windows Me
This installation procedure will successfully install two USB 1.1 OHCI controllers, one USB 2.0 EHCI host controller, and one IEEE 1394 host controller.
- Insert the F5U508 installation CD into your CD-ROM drive. After a few moments, the main menu will automatically start and display each of the available installation options.
- Select "Install USB 2.0 Driver". After clicking "Next" on the InstallShield Wizard, select "No, I will restart my computer later". Then click "Finish". Then "Exit" on the F5U508 screen.
- Open the Start menu in the lower, left-hand corner of your Windows display. Select "Shut Down" and click "OK".
- Once the computer has completely shut down, remove the computer's cover and locate an empty PCI slot.
- Remove the port cover that corresponds with the PCI slot you wish to use. (The cover is usually held in place with a single screw).
- Insert the PCI Card into the slot. Apply pressure as needed until the Card is fully seated. Secure the PCI Card with the screw removed in step #5, above.
- After installing the PCI Card, replace the outer cover and turn on the computer.
- When Windows restarts, the PCI Card will be detected and installation of the required drivers will begin.
Note: Depending on the speed of your computer, it may take up to 30 seconds for the PCI Card to be detected.
Installation
- Windows will detect and install the “Ali PCI to USB Open Host Controller” (twice), “USB Root Hub” (twice), “Ali PCI to USB Enhanced Host Controller”, and a “USB 2.0 Root Hub”.
- Select "Automatic Search for the best driver for your device Recommended)" and click "Next".
- Windows will now search its driver database for the required driver.
- You maybe prompted to insert the Windows Me installation CD into your CD-ROM drive to install the "1394bus.sys" file. Insert the CD and click "OK".
Note: The directory being displayed on the screen requesting your Windows Me installation CD may not be correct. Typically, the drivers are in a folder labeled "Win9X" on your Windows Me CD.
- Installation of the "OHCI Compliant IEEE 1394 Host Controller" is now complete. Click "Finish".
- A “System Settings Change” window will pop up asking you to restart your computer in order for the changes to take effect. Click “Yes” to restart.
Verifying Proper Installation (Windows Me)
After installation, check the Windows Device Manager to confirm that the PCI Card has been properly installed.
- Right-click on "My Computer" and select "Properties".
- Select the "Device Manager" tab.
EN

Installation
- Click on the plus sign (+) next to “Universal Serial Bus Controllers”. The “Universal Serial Bus Controllers” list will now include two “ALi to USB Open Host Controller” entries, one “ALi to USB Enhanced Host Controller” entry, one “USB 2.0 Root Hub” entry, and two “USB Root Hub” entries.
Note: If your computer features built-in USB ports, or if you have other USB PCI controller cards installed, you will see additional USB controller and root hub entries.
- Click the plus sign (+) next to “IEEE 1394 Bus Controller”. The “IEEE 1394 Bus Controller” list will now include one “PCI OHCI Compliant IEEE 1394 Host Controller” entry.
Note: If your computer features built-in IEEE 1394 ports, or if you have other IEEE 1394 PCI host controller cards installed, you will see additional “IEEE 1394 Host Controller” entries.
- Click the plus sign (+) next to “Network Adapters”.
- The “Network Adapters” list will now include one “NDIS 1394 Net Adapter” entry.
Note: If your computer features built-in IEEE 1394 ports, or if you have other IEEE 1394 PCI host controller cards installed, you will see additional “IEEE 1394 Host Controller” and “NDIS 1394 Net Adapter” entries.
Installation Procedure for Windows 2000
This installation procedure will successfully install two USB 1.1 OHCI controllers, one USB 2.0 EHCI host controller, and one IEEE 1394 host controller.
If you are running Windows 2000 with Service Pack 4, all required drivers are already included in your operating system. It is not necessary to install the drivers included on the F5U508 installation CD.
To confirm which version of Windows is installed on your computer, right-click the "My Computer" icon located on your Windows desktop, then select "Properties".
The “System Properties” window will open and provide information regarding the version of Windows installed on your computer. If Windows Service Pack 3 or below is installed, you must install the drivers provided on the F5U508 installation CD.
If you find that Windows 2000 Service Pack 4 is installed, follow the steps below.
- Open the Start menu in the lower, left-hand corner of your Windows desktop, then select "Shut Down" and click "OK".
- Once the computer is completely shut down, remove the computer's cover and locate an empty PCI slot.
Installation
- Remove the port cover that corresponds with the PCI slot you wish to use. (The cover is usually held in place with a single screw).
- Insert the PCI Card into the slot. Apply pressure as needed until the Card is fully seated. Secure the PCI Card with the screw removed in step 3.
- After installing the PCI Card, replace the outer cover and turn on the computer.
- When Windows restarts, the PCI Card will be detected and install drivers for two “Ali PCI to USB Open Host Controller”, one “Standard Enhanced PCI to USB Host Controller”, one “USB 2.0 Root Hub”, two “Root Hub” entries, and one “OHCI Compliant IEEE 1394 Host Controller”.
Note: Depending on the speed of your computer, it may take up to 45 seconds for the PCI Card to be detected.
Verifying Proper Installation for Windows 2000 with Service Pack 4
After installation, check the Device Manager to confirm that the PCI Card has been properly installed.
- Right-click on "My Computer".
- Select "Properties".
- Select the "Hardware" tab and click on the "Device Manager" button.
- Click the plus sign (+) next to "Universal Serial Bus Controller".
The “Universal Serial Bus Controllers” list will now include two “ALi PCI to USB Open Host Controller” entries, one “Standard Enhanced PCI to USB Host Controller”, one entry for “USB 2.0 Root Hub”, and two entries for “USB Root Hub”.
Note: If your computer features built-in USB ports, or if you have other USB PCI controllers installed, you will see additional root hub entries.
- Click the plus sign (+) next to “IEEE 1394 Bus Controller”. The “IEEE 1394 Bus Controller” list will now include one “OHCI Compliant IEEE 1394 Host Controller” entry.
Note: If your computer features built-in IEEE 1394 ports, or if you have other IEEE 1394 PCI host controller cards installed, you will see additional IEEE 1394 host controller entries.
If Windows 2000 with Service Pack 3 or below is installed on your computer, follow the instructions below.
- Insert the F5U508 installation CD into your CD-ROM drive. After a few moments, the main menu will automatically start and display each of the available installation options.
- Select "Install USB 2.0 Driver". After the driver is installed, select "No, I will restart my computer later". Select "Finish". Then select "Exit".
- Open the Start menu in the lower, left-hand corner of your Windows display, then select "Shut Down" and click "OK".
Installation
- Once the computer has completely shut down, remove the computer's cover and locate an empty PCI slot.
- Remove the port cover that corresponds with the PCI slot you wish to use. (The cover is usually held in place with a single screw).
- Insert the PCI Card into the slot. Apply pressure as needed until the Card is fully seated. Secure the PCI Card with the screw removed in step 5.
- After installing the PCI Card, replace the outer cover and turn on the computer.
- When Windows restarts, the PCI Card will be detected and all required drivers will be automatically installed. After the install is complete, you may be prompted to click "Finish" and to restart your computer.
Note: Depending on the speed of your computer, it may take up to 30 seconds for the PCI Card to be detected.
Verifying Proper Installation (Windows 2000)
After installation is complete, check the Windows Device Manager to confirm that all components of the PCI Card have been properly installed.
- Right-click on "My Computer".
- Select "Properties".
- Select the "Hardware" tab and click on the "Device Manager" button.
Note: You will notice that there are two “Universal Serial Bus Controller” entries listed.
- Click the plus sign (+) next to the first “Universal Serial Bus Controller”. The “Universal Serial Bus Controller” list will include one entry for “Ali PCI to Enhanced USB Host Controller” and one entry for “USB 2.0 Root Hub”.
- Click the plus sign (+) next to the next “Universal Serial Bus Controller”. The “Universal Serial Bus Controller” list will now include two “ALi to USB Open Host Controller” entries, and two “USB Root Hub” entries.
Note: If your computer features built-in USB ports, or if you have other USB PCI controllers installed, you will see additional root hub entries.
- Click the plus sign (+) next to “IEEE 1394 Bus Controller”. The “IEEE 1394 Bus Controller” list will now include one “OHCI Compliant IEEE 1394 Host Controller” entry.
Installation
Note: If your computer features built-in IEEE 1394 ports, or if you have other IEEE 1394 host controllers installed, you will see additional “IEEE 1394 Host Controller” entries.
EN


16
Installation Procedure for Windows XP
This installation procedure will successfully install two USB 1.1 OHCI controllers, one USB 2.0 EHCI host controller, and one IEEE 1394 host controller.
If you are running Windows XP with Service Pack 1, all required drivers are already included in your operating system. It is not necessary to install the drivers included on the F5U508 installation CD.
To confirm which version of Windows is installed on your computer, right-click the "My Computer" icon located on your Windows desktop, then select "Properties".
The “System Properties” window will open and provide information regarding the version of Windows installed on your computer. If Windows “Service Pack 1” or later is not installed, you must install the drivers provided on the F5U508 installation CD.
If you find that Windows XP “Service Pack 1” is installed, follow the steps below.
- Open the Start menu in the lower, left-hand corner of your Windows display, then select "Shut Down" and click "OK".
- Once the computer is completely shut down, remove the computer's cover and locate an empty PCI slot.
- Remove the port cover that corresponds with the PCI slot you wish to use. (The cover is usually held in place with a single screw).
Installation
- Insert the PCI Card into the slot. Apply pressure as needed until the Card is fully seated. Secure the PCI Card with the screw removed in step 3.
- After installing the PCI Card, replace the outer cover and turn on the computer.
- When Windows restarts, the PCI Card will be detected and install drivers for two “Ali PCI to USB Open Host Controller” entries, one “Standard Enhanced PCI to USB Host Controller” entry, one “USB 2.0 Root Hub” entry, two “Root Hub” entries, and one “OHCI Compliant IEEE 1394 Host Controller” entry.
Note: Depending on the speed of your computer, it may take up to 45 seconds for the PCI Card to be detected.
Verifying Proper Installation for Windows XP with Service Pack 1
After installation, check the Device Manager to confirm that the PCI Card has been properly installed.
- Right-click on "My Computer".
- Select "Properties".
- Select the “Hardware” tab and click on the “Device Manager” button. The “Universal Serial Bus Controllers” list will now include two “ALI to USB Open Host Controller” entries, one “ALI to USB Enhanced Host Controller” entry, one “USB 2.0 Root Hub Device” entry, one “Standard Enhanced PCI to USB Host Controller” entry, and two “USB Root Hub” entries.
Note: If your computer features built-in USB ports, or if you have other USB PCI controllers installed, you will see additional root hub entries.
- Click the plus sign (+) next to "IEEE 1394 Bus Controller".
The “IEEE 1394 Bus Controller” list will now include one “OHCI Compliant IEEE 1394 Host Controller” entry.
- Click the plus sign (+) next to "Network Adapters".
The “Network Adapters” list will now include one “1394 Net Adapter”.
Note: If your computer features built-in IEEE 1394 ports, or if you have other IEEE 1394 PCI host controller cards installed, you will see additional IEEE 1394 host controller and 1394 net adapter entries.
If you do not have Windows XP Service Pack 1, follow the instructions below:
- Insert the F5U508 installation CD into your CD-ROM drive. After a few moments, the main menu will automatically start and display each of the available installation options.
- Select "Install USB 2.0 Driver".
- After the driver has been installed, Windows will prompt you to restart your computer. Select "No, I will restart my computer later". Click "Close".
- Open the Start menu in the lower, left-hand corner of your Windows desktop, then select "Shut Down" and click "OK".
- Once the computer is completely shut down, remove the computer's cover and locate an empty PCI slot.
Installation
- Remove the port cover that corresponds with the PCI slot you wish to use. (The cover is usually held in place with a single screw).
- Insert the PCI Card into the slot. Apply pressure as needed until the Card is fully seated. Secure the PCI Card with the screw removed in step 6.
- After installing the PCI Card, replace the outer cover and turn on the computer.
- When Windows restarts, the PCI Card will be detected and drivers for the IEEE 1394 host controller, the IEEE 1394 net adapter, and two USB OHCI host controllers with their associated root hubs will be automatically installed.
Note: Depending on the speed of your computer, it may take up to 45 seconds for the PCI Card to be detected.
- Windows will now search for drivers for the "ALi PCI to USB Enhanced Host Controller" and the "New Hardware Wizard" will start. Select "Install the software automatically (Recommended)". Click "Next".
- Drivers for the “Ali PCI to USB Enhanced Host Controller” will now be located. Click “Finish”.
- Windows will now detect the "USB 2.0 Root Hub Device". Select "Install the software automatically (Recommended). Click "Next".
- Drivers for the "USB 2.0 Root Hub Device" will now be located. Click "Next". Then on the following screen click "Finish".
- Windows will now present you with the option of setting up a network. If you do not wish to set up an IEEE 1394 network, ignore this option. (Please check your Windows XP help file for more information on setting up and using an IEEE 1394 network).
The installation procedure is now complete.
Verifying Proper Installation (Windows XP)
After installation, check the Device Manager to confirm that the PCI Card has been properly installed.
- Right-click on "My Computer".
- Select "Properties".
- Select the "Hardware" tab and click on the "Device Manager" button.
- Click the plus sign (+) next to "Universal Serial Bus Controller".
The “Universal Serial Bus Controller” list will now include one entry for “ALi PCI to USB Enhanced Host Controller” and one entry for “USB 2.0 Root Hub”. - Click the plus sign (+) next to "Universal Serial Bus Controllers".
The “Universal Serial Bus Controllers” list will now include two “Ali PCI to USB Open Host Controller” entries and two “USB Root Hub” entries.
Note: If your computer features built-in USB ports, or if you have other USB PCI controllers installed, you will see additional root hub entries.
- Click the plus sign (+) next to "IEEE 1394 Bus Controller".
The “OHCI Compliant IEEE 1394 Host Controller” list will now include one “OHCI Compliant IEEE 1394 Host Controller” entry. - Click the plus sign (+) next to "Network Adapters".
The “Network Adapters” list will now include one “1394 Net Adapter”.
Note: If your computer features built-in IEEE 1394 ports, or if you have other IEEE 1394 PCI host controller cards installed, you will see additional “IEEE 1394 Host Controller” and “1394 Net Adapter” entries.
Installation
Installing a hi-speed usb 2.0 hub
Note: During installation of the Belkin Hi-Speed USB 2.0 and FireWire PCI Card driver, a Hi-Speed USB 2.0 hub driver is also installed. When you attach a Hi-Speed USB 2.0 hub to your PCI Card for the first time, follow the procedure described below.
- Turn on your computer.
- Plug the power adapter (ships with the hub) into the hub and into a wall outlet.
- Connect the flat end of the USB cable supplied with the hub to your computer and the square end of the cable to the upstream port of the hub.
- Windows will automatically detect the hub and start the "Add New Hardware Wizard". The Wizard will search for drivers for a "Generic USB Hub on USB 2.0 Bus". Click "Next". (If the search results list drivers for a "Generic USB Hub" instead, cancel the Wizard, go back to Device Manager, and confirm that the Belkin 2.0 drivers have been properly installed.)
- Choose "Search for the best driver for your device (Recommended)". Click "Next" to continue.
- Windows will now search the driver database on your hard drive. Remove the check mark from all boxes and click "Next".
- Windows will locate the driver for "Generic USB Hub on USB 2.0 Bus". Click "Next".
- Click "Finish". Installation of your hub is now complete.
Value-Added Software
The F5U508 includes groundbreaking photo-editing software applications from Ulead®:
Ulead VideoStudio® 5.0 is one of the most complete consumer video editors available, allowing you to capture and edit high-quality DV images and export them in any way you choose. It lets you add striking titles, 3-D transitions, video filter effects, video/graphic overlays, and music or voice-over. You can also share your video on tape, CD, and through the Web.
Ulead Photo Express™ 4.0 - My Custom Addition supplies everything you need to get started with photo editing and sharing! It enables you to get photos from almost anywhere, then sort them in seconds with a visual thumbnail browse mode. You can also retouch problem photos with quick and easy enhancement tools.
Ulead COOL™ 360 offers an amazing feature that lets you quickly and easily transform a series of photos into 360° or wide-angle panoramas. With COOL 360, you can save panoramas in popular file formats including MOV, e-mail executable panorama files, and output HTML files for posting panoramas to the Web. It lets you easily create personalized screen savers, print panoramas on single or multiple pages, copy panoramas to presentations and office documents, and more.
FCC Statement
DECLARATION OF CONFORMITY WITH FCC RULES FOR ELECTROMAGNETIC COMPATIBILITY
We, Belkin International Inc., of 501 West Walnut Street, Compton, CA 90220, declare under our sole responsibility that the product:
F5U508 to which this declaration relates:
Complies with Part 15 of the FCC Rules. Operation is subject to the following two conditions: (1) this device may not cause harmful interference, and (2) this device must accept any interference received, including interference that may cause undesired operation.
CE Declaration of Conformity
We, Belkin International Inc., declare under our sole responsibility that the F5U508, to which this declaration relates, is in conformity with Generic Emissions Standard EN 55022:1998 Class B, EN50081-1 and with Generic Immunity Standard EN50082-1 1992.
Belkin International, Inc. Limited Lifetime Product Warranty
Belkin International Inc. warrants this product against defects in materials and workmanship for its lifetime. If a defect is discovered, Belkin will, at its option, repair or replace the product at no charge provided it is returned during the warranty period, with transportation charges prepaid, to the authorized Belkin dealer from whom you purchased the product. Proof of purchase may be required.
This warranty does not apply if the product has been damaged by accident, abuse, misuse, or misapplication; if the product has been modified without the written permission of Belkin; or if any Belkin serial number has been removed or defaced.
THE WARRANTY AND REMEDIES SET FORTH ABOVE ARE EXCLUSIVE IN LIEU OF ALL OTHERS, WHETHER ORAL OR WRITTEN, EXPRESSED OR IMPLIED. BELKIN SPECIFICALLY DISCLAIMS ANY AND ALL IMPLIED WARRANTIES, INCLUDING, WITHOUT LIMITATION, WARRANTIES OF MERCHANTABILITY AND FITNESS FOR A PARTICULAR PURPOSE.
Information
No Belkin dealer, agent, or employee is authorized to make any modification, extension, or addition to this warranty.
BELKIN IS NOT RESPONSIBLE FOR SPECIAL, INCIDENTAL, OR CONSEQUENTIAL DAMAGES RESULTING FROM ANY BREACH OF WARRANTY, OR UNDER ANY OTHER LEGAL THEORY, INCLUDING BUT NOT LIMITED TO LOST PROFITS, DOWNTIME, GOODWILL, DAMAGE TO OR REPROGRAMMING OR REPRODUCING ANY PROGRAM OR DATA STORED IN OR USED WITH BELKIN PRODUCTS.
BELKIN®
Belkin International, Inc.
501 West Walnut Street
Compton, CA, 90220-5221, USA
+1 310 898 1100
+1 310 898 1111 fax
Belkin Ltd.
Express Business Park
Shipton Way, Rushden
NN10 6GL, United Kingdom
+44 (0) 1933 35 2000
+44 (0) 1933 31 2000 fax
Belkin B.V.
Boeing Avenue 333
1119 PH Schiphol-Rijk, Netherlands
+31 (0) 20 654 7300
+31 (0) 20 654 7349 fax
Belkin GmbH
Hanebergstrasse 2
80637 Munich, Germany
+49 (0) 89 143405 0
+49 (0) 89 143405 100 fax
Belkin SAS
130 rue de Silly
92100 Boulogne-Billancourt, France
+33 (0) 1 41 03 14 40
+33 (0) 1 41 31 01 72 fax
Belkin Iberia
Avda. Cerro del Aguila 3
28700 San Sebastián de los Reyes, Spain
+34 9 16 25 80 00
+34 9 02 02 00 34 fax
Please visit our website www.belkin.com for technical support or further information.
Disposal of Waste Equipment by Users in Private Households in the European Union:
For more information, go to www.belkin.com/environmental
© 2007 Belkin International, Inc. All rights reserved. All trade names are registered trademarks of respective manufacturers listed. Mac OS and Mac are trademarks of Apple Computer, Inc., registered in the U.S. and other countries.
P75248ea-A
BELKIN®
natural_image
Two people smiling while looking at a laptop keyboard (no visible text or symbols)natural_image
Close-up of a blue PCI-based electronic circuit board (no visible text or symbols)501 West Walnut Street
Express Business Park
Shipton Way, Rushden
natural_image
Two people smiling while looking at a laptop keyboard (no visible text or symbols)natural_image
Close-up of a blue PCI-based electronic circuit board (no visible text or symbols)Benutzerhandbuch
DE
F5U508
Inhaltsverzeichnis
Einleitung ....1
Übersicht 2
Merkmale....2
501 West Walnut Street
Compton, CA, 90220-5221, USA
+1 310 898 1100
+1 310 898 1111 Fax
Belkin Ltd.
Express Business Park
Shipton Way, Rushden
natural_image
Two people gathered around a laptop displaying a black-and-white grid of text (no readable document content)natural_image
Close-up of a blue PCI-based electronic circuit board (no visible text or symbols)Handleiding
NL
F5U508
Inhoud
Inleiding....1
Overzicht 2
Productkenmerken....2
Value-added softwarepakket 24
Informatie....25
Value-added softwarepakket
501 West Walnut Street
Compton, CA, 90220-5221, USA
+1 310 898 1100
+1 310 898 1111 fax
Belkin Ltd.
Express Business Park
Shipton Way, Rushden
natural_image
Two people smiling while looking at a laptop displaying a grid of text (no visible text on screen or background)natural_image
Close-up of a blue PCI-based electronic circuit board (no visible text or symbols)Manual del usuario
ES
F5U508
501 West Walnut Street
Express Business Park
Shipton Way, Rushden
natural_image
Two people gathered around a laptop displaying a black-and-white grid of text (no readable document content)natural_image
Close-up of a blue PCI-based electronic circuit board (no visible text or symbols)Manuale d'uso
IT
F5U508
Indice
Introduzione....1
501 West Walnut Street
Compton, CA, 90220-5221, USA
+1 310 898 1100
+1 310 898 1111 fax
Belkin Ltd.
Express Business Park
Shipton Way, Rushden
501 West Walnut Street
Compton, CA, 90220-5221, USA
+1 310 898 1100
+1 310 898 1111 fax
Belkin Ltd.
Express Business Park
Shipton Way, Rushden
NN10 6GL, United Kingdom
+44 (0) 1933 35 2000
+44 (0) 1933 31 2000 fax
Belkin B.V.
Boeing Avenue 333
1119 PH Schiphol-Rijk, Netherlands
+31 (0) 20 654 7300
+31 (0) 20 654 7349 fax
Belkin GmbH
Hanebergstrasse 2
80637 Munich, Germany
+49 (0) 89 143405 0
+49 (0) 89 143405 100 fax
Belkin SAS
130 rue de Silly
92100 Boulogne-Billancourt, France
+33 (0) 1 41 03 14 40
+33 (0) 1 41 31 01 72 fax
Belkin Iberia
Avda. Cerro del Aguila 3
28700 San Sebastián de los Reyes, Spain
+34 9 16 25 80 00
+34 9 02 02 00 34 fax
Please visit our website www.belkin.com for technical support or further information.
Disposal of Waste Equipment by Users in Private Households in the European Union:
For more information, go to www.belkin.com/environmental
© 2007 Belkin International, Inc. All rights reserved. All trade names are registered trademarks of respective manufacturers listed. Mac OS and Mac are trademarks of Apple Computer, Inc., registered in the U.S. and other countries.
P75248ea-A